Thursday, October 30, 2008

Holiday Gift Bag and Monogram Cards


This is another project idea I got from UStamp and I am very pleased with the way it turned out.
The gift bag is made from a white lunch bag and I have put 6 monogram cards with envelopes inside.
I used the phrase "Just Becasue I Care" because I may give this before Christmas. The cards are blank inside and therefore they could be used for a Thank You card, thinking of you, or just a note card.
Recipe:
Stamps: Best Yet, Defining Alphabet
Ink: Always Artichoke, Sage Shadow Marker
Paper: Wintergreen Designer Paper, Soft Sky, Whisper White
Embellishments: Rhinestone Brads, Silver Brads, Blue Sky Grosgrain Ribbon, Metal Edge Tags, Dazzing Daimonds, Little Felt Flurries, snow flake punch, designer label punch

Wednesday, October 29, 2008

Unbelievable


I would not have believed it if it were not for my friend Corinne posting her pictures on her blog this morning. I was at Corinne's house last night (loved the projects and had a blast) and when I left the ground was wet but green.

Both of these pictures were taken this morning (the one of top early morning and the one below mid morning) but what a difference in scenery. Geographically I know this is possble but can you believe only 30 minutes way (15 minutes south and 15 minutes east)?

The picture on the right is taken from the deck looking out my backyard (sounds like a song) and yes my children went to school today and the buses were running.

The picture on the left was taken from Corinne's front yard (notice the hydro truck in the background trying to restore hydro) and joyously (is that even a word?) no school today or at least buses cancelled.

There are times when the weather can be so unpredictable in South Western Ontario especially during the winter months; it is like living on the other side of the world. Pretty amazing huh!

I will try to get back later today with some stamping stuff. Thanks for stopping by and enjoy your day where ever you may be.

Tuesday, October 28, 2008

Get Organized


Have I mentioned how much I love and enjoy UStamp!?!
Well I do!
This is the most recent project on UStamp and I plan on making a few of these for Christmas gifts.
You know it is not to early to start shopping/stamping for special people on your list.
Although I was using up limited edition cardstock (Winter Bright) it can easily made with any colour combination.
If you are interested in learning how to make this calender, or having a get together with friends contact me at dale.livingston@sympatico.ca to set up a date and we can have a lot of fun making this calender. You will love the memories each month as your change the calender along with the photo and you even have space for favourite recipes, grocery list, school events etc.
Just think, this would help with your scrapbooking too.

Friday, October 24, 2008

Waterfall Scrapbook


I absolutely love this scrapbook and think it will make a great gift idea for someone special on my Christmas List.
This Waterfall Scrapbook was one of the projects I learned on UStamp 08 Holidays.
Once I decide who will get this little book, I will add photos on all 9 pages.
I plan on offering this as a class before Christmas so keep checking back.
My waterfall scrapbook is made using "Best Ever" Simply Scrappin' Kit and Ski Slope designer paper and little felt flurries from the Holiday Mini.

Monday, October 20, 2008

Another Reason to Celebrate


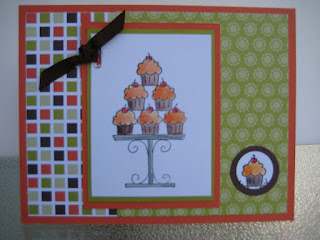
Little Sophie's first birthday is next week and I wanted to make her a card using Crazy for Cupcakes (which is on sale right now; see the add on the right side bar for details) because of the large cupcake with one candle and my favourite Designer Paper Bella Rose. (Click on photo to enlarge)
I paper pieced the bottom of the cupcake and candle with designer paper and decorated the cupcake with pink and red brads. I really like the effect of using the slot punch on the left side and balance the card with the oval sentiment.
Recipe:
Stamps: Crazy for Cupcakes, Family Phrases
Ink: Basic Black, Pink Piroutette, Barely Banana stampin' write marker
Paper: Bella Rose Designer Paper, choclate chip, whisper white, pink pirouette
Embellishments: Soft Subtle Brads, Bold Brights Brads. small & medium oval punch, slot punch
Happy First Birhtday Sophie!

Friday, October 17, 2008

Birthday Celebration


I can't believe it's Friday, where did the week go?
I cased this card from Heather and changed up the designer paper to Hawaii Papaya. I made it for my sister-in-law/best friend so I have it signed and ready to go in the mail.
Stampin' Up! is having a Birthday Stamp Sale for the month of October and Crazy for Cupcakes is on the list. You can also click on the icon on the right of my blog to get more details or call or e-mail me for more information and to place an order.
Recipe:
Crazy for Cupcakes #111618 $28.95 on sale for $23.16
Hawaii Papaya Designer Paper #112460 $11.75
Ink: Basic Black Ink Pad #101179 $6.25
Bashful Blue Ink Pad #105209 $6.25
Tangerine Tango Ink Pad #111834 $6.25
Aqua Painter #103954 $19.95 (pkg. of 2)
Real Red Stampin' Write Marker #100052 $3.95
1 3/4 Circle Punch #112004 $19.95
1" Circle Punch #109046 $13.75
1/2 Circle Punch #104390 $7.50
Thanks for stopping by and have a great weekend.

Monday, October 13, 2008

It's Time to Stop Collecting


It is official I am a card collector, actually I collect paper too.
I made this card last year around this time of year and never gave it away becasue it is so cute and thought I would keep it as a template for another time.
I used two stamps which are now retired - Weathered BG and Booglie Eyes and now it is time to send this card away to someome who loves Halloween and this stamp set. I thought I would post this card becasue it is the season and I love the layout and the simplicity of this card.
Christmas is coming so I am sure this would make a beautiful card using snowflakes perhaps.

Happy Thanksgiving


The other day I mentioned I would try to get pictures of my Thanksgiving table and so here it is. You will notice the paper pumpkins as well as each place setting had a little treat pouch (sour cream container) and this was a big hit; a lot of conversation around these little babies. Along with pumpkin pie I made chocolate cupcakes and added a pumpkin decoration. Nicole had an idea to make a turkey using Stampin' Up! punches and cardstock. Yes everything was made with a punch...pretty clever!
Happy Thanksgiving

Friday, October 10, 2008

Deer Friends


The Halloween Lollipop Box was very well received by Nicole's teacher and I have been asked to teach this project to students during the lunch hour as an alternative activity to keep students on school property during lunch.
Electives for October are filled up so we will be making a Christmas themed lollipop box with non other than "Deer Friends"...I love this set.
This will be so much fun.
Did I mention I learned how to make this from UStamp - just click on the right side bar for more information about UStamp Holiday which starts on Sunday, October 12, 2008. You won't be disappointed! Tell them Dale sent you.
Recipe:
stamps: Deer Friends
ink: Bali Breeze, Riding Hood Red, Kiwi Kiss
paper: whisper white, bali breeze, kiwi kiss, riding hood red
Other: 1 3/8", 1 1/4", and 1" circle punches, scallop punch, riding hood red 5/8" ribbon (cut in half)

Thursday, October 9, 2008

Deer Friends


I absolutely love this stamp set "Deer Friends"! You can do so much with it - cards, tags, lollipop covers, gift boxes/bags the possibilities are endless.
One of the projects from UStamp was a card set with a gift bag and I choose to do a Christmas theme using the Patterns Pack Designer Series Paper from Stampin' Up!, Deer Friends, Heard From the Heart and a little ribbon. I love the simplicity of these Christmas cards and they could easily be mass produced .
If you would like to add Deer Friends to your wish list contact me to host a workshop. All you need to do is invite some friends and be prepared to have fun. You could have your workshop at your house or mine what ever works best for you.

Wednesday, October 8, 2008

Paper Pumpkins


This weekend is the Canadian Thanksgiving and I thought I would decortae my dinner table with a few of these super cute paper pumpkins. I made these with 8 strips of 1" X 6" designer paper and used the 1/8" hand held circle punch to punch a hole at each end of the paper strips. I stacked the 8 strips together and insert a silver brad then fanned the strips in a circle and one by one insert each strip onto another brad to secure. After I had my paper balls made I noticed Dawn had made leaves and vines to add to the pumpkins so I did the same. To make the leaves I simply took a scrap piece of green cardstock and folded it in half and cut out a half of a leaf and put it through the paper crimper (while folded) and attached with a glue dot. The curly vine was formed by taking a thin strip of paper and wrapping it around a pencil and attaching with a glue dot as well. You can then pull the vine a bit to stretch it out.
I noticed in stores the over priced paper crackers for Fall (just like the ones at Christmas) and thought I would make some of the sour cream treat containers and place one at every place setting as well. I though it would be fun to fill them with a treat and some of the theme shaped confetti you can find at the dollar store.
If you saw A Morning (London TV Station) Heather was demonstrating these cute little containers (along with some other great ideas from Stampin' Up!). Heather you were amazing. I wouldn't be surprised if she is invited back for a Christmas themed project.
I will try to post a picture of my harvest table this weekend. Have a great day and Thanks for droping by to see what I have been up to.
By the way, I am working on adding the "comment" option to my blog but haven't figured it out yet but when I do please feel free to leave me a comment. Thanks.

Tuesday, October 7, 2008

Define Your Life


Friday marked the 16th Anniversary for my husband Lance and my wedding day and naturally I had to make him a card. Manly cards sometimes stump me only because most of my stamp sets are feminine looking and I also like to use embellishments (especially ribbon - Stampin' Up! has very yummy ribbon). This is what I came up with using Define Your Life and Defining Alphabet and jumbo brads.


I have to show you the beautiful roses (24 of them) Lance gave me for our anniversary. Lance always remembers to give cards as well. No not handmade (hee hee).


Monday, October 6, 2008

World Card Making Day


Today is my World Card Making Day Open House and I invite you to celebrate someone with a handmade card.
This is the card we will be making tonight.
After I made this card, I wished I had used Elegant Eggplant brads but Stampin' Up! does not make this colour. My very talented and resourceful up line Heather had suggested taking a sharpie purple marker and colouring the top of the brad and guess what...it works great.
Hope to see you tonight.Happy Harmony
Thanks for looking in what I have been up to and have a great Autumn Day.

Sunday, October 5, 2008

Not So Scary BOO


Friday was a P.D. day for schools in our area and while I was trying to figure out this blog and how to leave a comment my 12 year old daughter decided to do some stamping.


Nicole came up with this idea and I think is so cute. I really like her idea of tearing the stamped images and using dimensionals to pop them up.


If I can get the "comment" link to work we would love to hear what you think of Nicole's card. If anyone out there can give me a few pointers on how to add the comment to my blog I would love your help. Thanks for stopping by and hope you are enjoying your weekend.

Saturday, October 4, 2008

Spooky Webs


I was all set with another post for today but changed my mind after reading my good friend Heathers' blog yesterday. Heather invited anyone to try this technique and I was up for the challenge.
I outlined the spider web in pencil on the basic gray card stock then traced over it with the tombow glue and added purple cosmic glitter. I stamped the bat from Batty for You stamp set and punched him out with the 1" circle punch and attached him on a 1 1/4" circle of tangerine tango. I used dimensionals to pop the spiders up from the web.
I made a coordinating treat purse which I cased from Angie at Chic n' Scratch.
Forgive me for using non Stampin' Up! sentiments; my friend Heather is slowly turning me into a fan of Halloween with all of her beautiful projects.

Friday, October 3, 2008

Trick or Treat


I had so much fun making this treat can for my daughter Nicole to give to her teacher. Who would not like to place a treat tin on their desk or counter as an incentive for good work, good deeds, manners or just becasue. Although I used last years designer paper from Stampin' Up! it could very easily be reproduced using this years designer paper "Ghostly Greetings" or how fun to use the "Best Ever" Simply Scarppin' kits from Stampin' Up! to celebrate a birthday.


Stamps: Carved & Candlelit, Booglie Eyes (both retired) but you could use "Batty for You" or Tasty Sweet".


Paper: Creepy Crawly DP
Ink: Basic Black


Embellishments: Pumpkin Pie Grosgrain ribbon, black ribbon (not Stampin' Up!)

Thursday, October 2, 2008

A Season of Friendship


This is a new stamp set from the Holiday Mini. I love the simplicity and elegance of this stamp set. The kraft paper just sets the tone of all of this nicely. This is a perfect and inexpensive holiday hostess gift or teacher appreciation. It is easy to mass produce and would make anyones's day. I am encouraged by my very talented upline Heather whose blog you can see HERE and am offering this as a pre-order class where you will make 4 cards and a gift box and you will go home with the "Season of Friendship" stamp set so you can make more of these beautiful cards. The class will be held on
Monday November 24th
7:00pm - 9:00pm
$40
Kits are available to purchase as well if you are unable to attend the class.

Christmas Card Class


I know we have not celebrated Thanksgiving & Halloween yet and I am thinking Christmas already. I made this beautiful Christmas card at Heather's awhile back and have decided to get a jump start on Christmas. I am offering a Christmas Card class and you will make 5 different Christmas Cards, please R.S.V.P. if you would like to reserve a spot on:
Tuesday, Oct. 21st
7:00pm - 9:00pm
Cost: $20